原先 JBoss 自带的消息服务是
HornetQ 实现的,后来 HornetQ 合并到
Apache ActiveMQ 中了,因此新版的 WildFly 集成的默认消息服务实现就是 ActiveMQ 了。
本文将使用一个小示例从零开始演示如何在 WildFly 中使用 JMS. 本示例的大纲如下:
- 怎样在 WildFly 中启用 JMS
- 怎样在 Java 代码中使用 JMS
-
- 消息发送
- 消息同步接收
- 消息异步接收
- 消息驱动Bean
怎样在 WildFly 中启用 JMS
配置文件
要使用消息服务,我们需要完整的 JBoss 配置文件
standalone-full.xml, 默认的
standalone.xml 并未提供 JMS. 因此建议将 standalone-full 中的全部内容复制到 standalone 中,并修改自己改过的部分(如数据源配置等)。然后正常启动 WildFly 即可。(或者你可以直接使用
standalone.bat -c standalone-full.xml 命令启动)
现在就启动服务器吧。
添加用户
要使用 JMS, 必须有一个用户角色是
guest 的 WildFly 用户。如果之前没有添加的话,那么需要先添加一个用户。
在
%WildFly_HOME%\bin\ 目录下执行
add-user.bat 按提示添加用户
 1
 2
 3
 4
 5
 6
 7
 8
 9
10
11
12
13
14
15
16
17
18
19
20
21
22
23
24
25
26
27
28
29
30
31
|
D:\Program Files (x86)\wildfly-10.1.0.Final\bin>add-user.bat

What type of user do you wish to add?
 a) Management User (mgmt-users.properties)
 b) Application User (application-users.properties)
(a): b

Enter the details of the new user to add.
Using realm 'ApplicationRealm' as discovered from the existing property files.
Username : jmstest
Password recommendations are listed below. To modify these restrictions edit the add-user.properties configuration file.
 - The password should be different from the username
 - The password should not be one of the following restricted values {root, admin, administrator}
 - The password should contain at least 8 characters, 1 alphabetic character(s), 1 digit(s), 1 non-alphanumeric symbol(s)
Password :
WFLYDM0098: The password should be different from the username
Are you sure you want to use the password entered yes/no? yes
Re-enter Password :
What groups do you want this user to belong to? (Please enter a comma separated list, or leave blank for none)[  ]: guest
About to add user 'jmstest' for realm 'ApplicationRealm'
Is this correct yes/no? yes
Added user 'jmstest' to file 'D:\Program Files (x86)\wildfly-10.1.0.Final\standalone\configuration\application-users.properties'
Added user 'jmstest' to file 'D:\Program Files (x86)\wildfly-10.1.0.Final\domain\configuration\application-users.properties'
Added user 'jmstest' with groups guest to file 'D:\Program Files (x86)\wildfly-10.1.0.Final\standalone\configuration\application-roles.properties'
Added user 'jmstest' with groups guest to file 'D:\Program Files (x86)\wildfly-10.1.0.Final\domain\configuration\application-roles.properties'
Is this new user going to be used for one AS process to connect to another AS process?
e.g. for a slave host controller connecting to the master or for a Remoting connection for server to server EJB calls.
yes/no? yes
To represent the user add the following to the server-identities definition <secret value="am1zdGVzdA=="></secret>
请按任意键继续. . .
|
添加消息队列或消息话题。
进行本步骤之前请
确保服务器已正常启动。
再打开一个命令行。进入命令行的管理界面:
 1
 2
 3
 4
 5
 6
 7
 8
 9
10
11
12
|
$ cd /PATH/TO/wildfly-10.0.0.CR3-SNAPSHOT/bin
$ ./jboss-cli.sh -c

[standalone@localhost:9990 /] /subsystem=messaging-activemq/server=default/jms-queue=TestQ/:add(entries=["java:/jboss/exported/jms/queue/TestQ"])
  {"outcome" => "success"}

[standalone@localhost:9990 /] :reload
  {
    "outcome" => "success",
    "result" => undefined
  }
|
上述命令将会创建一个名为 TestQ 的消息队列。若要创建一个 Topic, 只需将 queue 换为 topic 即可。
1
2
|
/subsystem=messaging-activemq/server=default/jms-topic=TestTopic/:add(entries=["java:/jboss/exported/jms/queue/TestTopic"])
|
需要注意的是, entries 中内容开头必须为
java:/jboss/exported/xxx 这样在之后的 Java 中才能顺利找到 JNDI 名称。
该命令实际上是对配置的修改,你可以打开 standalone.xml 看看前后对比。
本部分参考:
Writing java based JMS Client for WildFly10 default ActiveMQ Artemis broker.
怎样在 Java 代码中使用 JMS
首先随便建个新项目我们演示一下。
(注意:需要%WildFly_HOME%\bin\client\jboss-client.jar)
消息发送
 1
 2
 3
 4
 5
 6
 7
 8
 9
10
11
12
13
14
15
16
17
18
19
20
21
22
23
24
25
26
27
28
29
30
31
32
33
34
35
36
37
38
39
40
41
42
43
44
45
46
47
48
49
50
51
52
53
54
55
56
57
58
59
60
61
62
63
64
65
66
67
68
69
70
71
72
73
74
75
76
77
78
79
80
81
82
83
84
85
86
87
88
89
90
91
92
93
94
|
package com.youthlin.demo.jmsdemo;

import javax.jms.Connection;
import javax.jms.ConnectionFactory;
import javax.jms.Destination;
import javax.jms.JMSException;
import javax.jms.MessageProducer;
import javax.jms.Session;
import javax.jms.TextMessage;
import javax.naming.Context;
import javax.naming.InitialContext;
import javax.naming.NamingException;
import java.text.SimpleDateFormat;
import java.util.Date;
import java.util.Locale;
import java.util.Properties;

/**
 * Created by lin on 2016-09-17-017.
 * 发送方。无论是消息队列的Queue还是Pub/Sub模式的 Topic,
 * 编程方式均一致,Java 中不需要管细节,至于究竟是队列还是主题,那是服务器的事,
 * 因为我们客户端只根据 JNDI 名称编码,不对消息的处理方式负责。
 * <p>
 * 一般步骤:
 * 1. 获得一个 JBoss 上下文引用
 * 2. 创建连接工厂
 * 3. 使用连接工厂创建连接
 * 4. 使用连接创建会话
 * 5. 通过 JNDI 查找 Queue 或 Topic 作为目的地
 * 6. 使用会话和目的地创建消息生产者
 * 7. 使用会话创建消息
 * 8. 发送消息
 */
public class JMSSender {

    /*发送消息,返回发送成功发送的条数,代码来源:课本*/
    private static int sendTextMessage(String... message) {
        int count = 0;
        InitialContext context = null;
        Connection connection = null;
        try {
            context = JMSUtil.getInitialContext();
            ConnectionFactory factory = (ConnectionFactory) context.lookup(JMSUtil.JMS_CONNECTION_FACTORY_JNDI);
            connection = factory.createConnection(JMSUtil.JMS_USERNAME, JMSUtil.JMS_PASSWORD);
            Session session = connection.createSession(false, Session.AUTO_ACKNOWLEDGE);
            Destination destination = (Destination) context.lookup(JMSUtil.JMS_TOPIC_JNDI);

            //6. 使用会话和目的地创建消息生产者
            MessageProducer producer = session.createProducer(destination);
            //连接开始
            connection.start();

            TextMessage textMessage;
            SimpleDateFormat sdf = new SimpleDateFormat("yyyy-MM-dd HH:mm:ss", Locale.SIMPLIFIED_CHINESE);
            for (String msg : message) {
                //7. 使用会话创建消息
                textMessage = session.createTextMessage(msg);
                textMessage.setStringProperty("time", sdf.format(new Date()));
                //8. 发送消息
                producer.send(textMessage);
                count++;
            }
            System.out.println("已发送" + count + "条消息");
        } catch (NamingException | JMSException e) {
            e.printStackTrace();
        } finally {
            if (connection != null) {
                try {
                    connection.close();
                } catch (JMSException e) {
                    e.printStackTrace();
                }
            }
            if (context != null) {
                try {
                    context.close();
                } catch (NamingException e) {
                    e.printStackTrace();
                }
            }

        }
        return count;
    }

    public static void main(String[] args) {
        String[] msgs = new String[5];
        for (int i = 0; i < 5; i++) {
            msgs[i] = "TestMessage" + i;
        }
        JMSSender.sendTextMessage(msgs);
        JMSSender.sendTextMessage("quit");
    }
}
|
其中,用到的 JMSUtil 类如下:
 1
 2
 3
 4
 5
 6
 7
 8
 9
10
11
12
13
14
15
16
17
18
19
20
21
22
23
24
25
26
27
28
29
30
31
32
33
34
35
36
37
38
39
|
package com.youthlin.demo.jmsdemo;

import javax.jms.Connection;
import javax.jms.ConnectionFactory;
import javax.jms.Destination;
import javax.jms.Session;
import javax.naming.Context;
import javax.naming.InitialContext;
import javax.naming.NamingException;
import java.util.Properties;

/**
 * Created by lin on 2016-09-17-017.
 * 相同的代码提取出来放在工具类中
 */
public class JMSUtil {
    final static String JMS_CONNECTION_FACTORY_JNDI = "jms/RemoteConnectionFactory";
    final static String JMS_TOPIC_JNDI = "jms/topic/MyTopic";//新建的消息队列/Topic JNDI 发布名称
    final static String JMS_USERNAME = "jmsuser";//添加的用户名,角色必须是"guest"/ApplicationRealm
    final static String JMS_PASSWORD = "jmsuser@123";//添加的用户的密码
    private final static String WILDFLY_REMOTING_URL = "http-remoting://localhost:8080";//注意前缀格式和端口,不是4447哦

    static InitialContext getInitialContext() throws NamingException {
        InitialContext context = null;
        try {
            Properties props = new Properties();
            props.put(Context.INITIAL_CONTEXT_FACTORY, "org.jboss.naming.remote.client.InitialContextFactory");
            props.put(Context.PROVIDER_URL, WILDFLY_REMOTING_URL);// NOTICE: "http-remoting" and port "8080"
            props.put(Context.SECURITY_PRINCIPAL, JMS_USERNAME);
            props.put(Context.SECURITY_CREDENTIALS, JMS_PASSWORD);
            //props.put("jboss.naming.client.ejb.context", true);
            context = new InitialContext(props);
            System.out.println("\n\tGot initial Context: " + context);
        } catch (Exception e) {
            e.printStackTrace();
        }
        return context;
    }
}
|
消息同步接收
 1
 2
 3
 4
 5
 6
 7
 8
 9
10
11
12
13
14
15
16
17
18
19
20
21
22
23
24
25
26
27
28
29
30
31
32
33
34
35
36
37
38
39
40
41
42
43
44
45
46
47
48
49
50
51
52
53
54
55
56
57
58
|
package com.youthlin.demo.jmsdemo;

import javax.jms.*;
import javax.naming.InitialContext;
import javax.naming.NamingException;
import java.util.concurrent.CountDownLatch;
import java.util.concurrent.TimeUnit;

/**
 * Created by lin on 2016-09-17-017.
 * 消息同步接收
 * <p>
 * 一般步骤:
 * 0. 确保 JBoss 服务器开启,因为我们需要分局服务器发布的 JNDI 名称获取相关对象
 * 1. 获得一个 JBoss 上下文引用
 * 2. 创建连接工厂
 * 3. 使用连接工厂创建连接
 * 4. 使用连接创建会话
 * 5. 通过 JNDI 查找 Queue 或 Topic 作为目的地
 * 6. 使用会话和目的地创建消息消费者
 * 7. 接收消息
 * 8. 处理消息
 */
public class JMSSyncReceiver {

    public static void main(String[] args) throws NamingException, JMSException, InterruptedException {
        InitialContext context = JMSUtil.getInitialContext();
        ConnectionFactory factory = (ConnectionFactory) context.lookup(JMSUtil.JMS_CONNECTION_FACTORY_JNDI);
        Connection connection = factory.createConnection(JMSUtil.JMS_USERNAME, JMSUtil.JMS_PASSWORD);
        Session session = connection.createSession(false, Session.AUTO_ACKNOWLEDGE);
        Destination destination = (Destination) context.lookup(JMSUtil.JMS_TOPIC_JNDI);

        //6. 创建消费者
        MessageConsumer consumer = session.createConsumer(destination);
        //连接开始
        connection.start();

        TextMessage msg = null;
        //CountDownLatch latch = new CountDownLatch(1);//同步计数器
        while (msg == null) {
            System.out.println("等待接收消息");
            //7. 等待接收消息
            //   参数时超时毫秒,为0或不带参数则表示一直阻塞在这里。超时无消息将返回null
            msg = (TextMessage) consumer.receive(5000);
            //latch.await(1, TimeUnit.SECONDS);//等待(相当于休眠)特定时间
            if (msg != null) {
                //8. 处理消息
                System.out.println("接收到的消息内容:" + msg.getText() + ",Time:" + msg.getStringProperty("time"));
                if (!msg.getText().equals("quit")) {
                    msg = null;//继续等待
                }
            }
        }
        connection.close();
        context.close();
    }

}
|
消息异步接收
 1
 2
 3
 4
 5
 6
 7
 8
 9
10
11
12
13
14
15
16
17
18
19
20
21
22
23
24
25
26
27
28
29
30
31
32
33
34
35
36
37
38
39
40
41
42
43
44
45
46
47
48
|
package com.youthlin.demo.jmsdemo;

import javax.jms.*;
import javax.naming.InitialContext;
import javax.naming.NamingException;
import java.util.concurrent.CountDownLatch;
import java.util.concurrent.TimeUnit;

/**
 * Created by lin on 2016-09-20-020.
 * 消息异步接收
 */
public class JMSAsyncReceiver {
    static boolean quit = false;

    public static void main(String[] args) throws NamingException, JMSException, InterruptedException {
        InitialContext context = JMSUtil.getInitialContext();
        ConnectionFactory factory = (ConnectionFactory) context.lookup(JMSUtil.JMS_CONNECTION_FACTORY_JNDI);
        Connection connection = factory.createConnection(JMSUtil.JMS_USERNAME, JMSUtil.JMS_PASSWORD);
        Session session = connection.createSession(false, Session.AUTO_ACKNOWLEDGE);
        Destination destination = (Destination) context.lookup(JMSUtil.JMS_TOPIC_JNDI);

        MessageConsumer consumer = session.createConsumer(destination);
        consumer.setMessageListener(new MessageListener() {//设置监听器
            @Override
            public void onMessage(Message message) {
                TextMessage msg = (TextMessage) message;
                try {
                    System.out.println("接收到的消息内容:" + msg.getText() + ",Time:" + msg.getStringProperty("time"));
                    if (msg.getText().equals("quit")) {
                        quit = true;
                    }
                } catch (JMSException e) {
                    e.printStackTrace();
                }
            }
        });

        connection.start();
        CountDownLatch latch = new CountDownLatch(1);
        while (!quit) {
            System.out.println("等待接收消息");
            latch.await(5, TimeUnit.SECONDS);
        }
        connection.close();
        context.close();
    }
}
|
运行效果
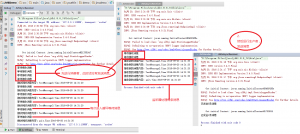 JMS消息发送与接收
消息驱动Bean
如果要在容器中使用的话,那么会更简单,只需使用注解修饰 消息驱动 Bean 即可,不需要像在 Java SE 中那样手动获取上下文获取连接之类的。
不过处理 Queue 和 Topic 的方式有点略微不同。
若是 Queue, 只需使用注解:
1
2
3
4
|
@MessageDriven(activationConfig = {
        @ActivationConfigProperty(propertyName = "destinationType", propertyValue = "javax.jms.Queue"),
        @ActivationConfigProperty(propertyName = "destination", propertyValue = "jms/queue/TestQ"),
})
|
若是 Topic, 还需要指明是否为持久化的 Topic, 以及 ClientId(需要持久化时,用于标识客户端,这样消息服务器才能知道这个消息你有没有消费过)
1
2
3
4
5
6
7
|
@MessageDriven(activationConfig = {
        @ActivationConfigProperty(propertyName = "destinationType", propertyValue = "javax.jms.Topic"),
        @ActivationConfigProperty(propertyName = "destination", propertyValue = "jms/topic/MyTopic"),
        @ActivationConfigProperty(propertyName = "subscriptionDurability", propertyValue = "Durable"),
        @ActivationConfigProperty(propertyName = "subscriptionName", propertyValue = "myTopic"),
        @ActivationConfigProperty(propertyName = "clientID", propertyValue = "consumer0"),
})
|
本文代码可在
GitHub 上找到。
MDB 需要部署到容器中,因此这里没有特意单独做一个可部署的工程示例,不过有例子可在
GitHub 上找到。

Reader Echoes
No comments yet